
How to Secure Your Apple ID
If you own any Apple devices or have a subscription to Apple Music and Apple TV, then you have an Apple ID. That one account connects you to tons of services. How do you make sure that no one steals your Apple ID or breaks into your account?
What’s inside your Apple ID?
Go to appleid.apple.com and log in. Here you’ll see the personal info you’ve given to Apple, such as your birthday and the country you live in. You’ll also see any subscriptions you’ve signed up for and the shipping address for purchases from Apple Stores. Not to mention all of your devices.
Unlike your Google account, you won’t see a list of all your internet activity. But your Apple ID does link to iCloud, which stores your tabs and bookmarks from Safari. There is a lot more in iCloud: your text messages, Wallet, calendar, contacts. Think of all your photos and videos, not to mention the files you’ve created in apps like Presentation or Pages.
There is a lot of information connected to your Apple ID. How can you keep it safe?
Two-Factor Authentication
As I said in my post “Securing Your Google Account,” two-factor authentication means using two things to gain access to something. This means that you’ll be using your password and something else to log into your Apple account. If you created your Apple ID on iOS 13.4 or macOS Catalina (or something newer), this was turned on automatically. Catalina was released in 2019, so if your Apple ID is older than that, you’ll need to turn it on. You can do that on your iPhone, iPad, your computer, or even in a web browser. If you’re using an iPhone or an iPad, you start by going to the Settings app, tapping your name, and selecting Sign In & Security. On an Apple computer, click the Apple menu, select System Preferences, and click on your name. For more detailed instructions, see this Apple support article.
Trusted Devices
The key to Apple’s two-factor authentication is setting up your first trusted device, which could be a phone, a tablet, or a computer. The first device you ever sign into with your Apple ID becomes your first trusted device.
After that, every time you log into your Apple account on a new device, you will see a notification appear on your trusted device saying that someone is trying to log into your account. After you tap “Allow,” your trusted device will display a verification code that you’ll type into the new device.
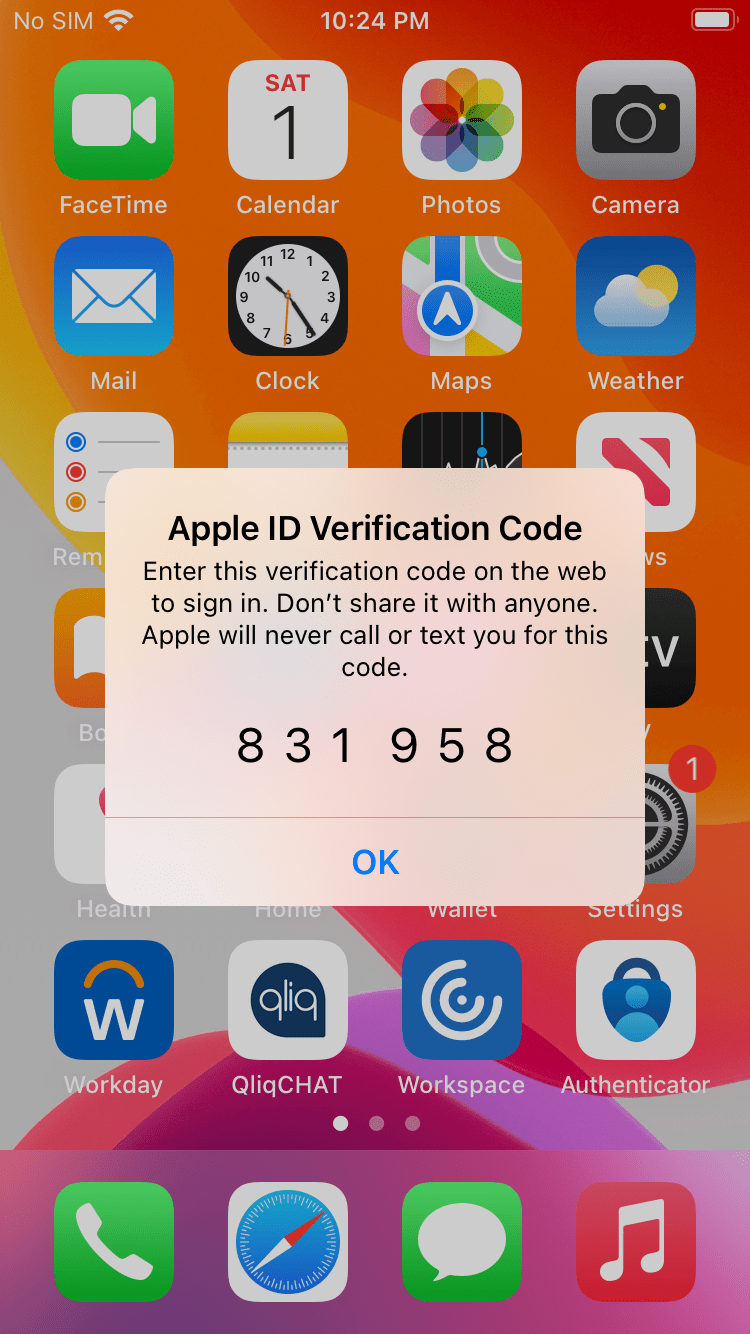
What happens if you don’t have your trusted device with you? On the login screen, click the link Didn’t Get A Code and send a text message to one of your trusted phone numbers.
Security Keys
A security key is a tiny device that stores a code that you can use to log into or unlock your Apple account. If you add security keys to your account, you will no longer get verification codes. This will provide you a lot more protection, but please note that you will need at least two security keys to start. One should be kept with you, and the other should be kept in a safe place. If you lose all of your keys, then you could get locked out of your account permanently.

Before you add security keys, check to see what kind of iPhone, iPad, or computer you have. Security keys are only compatible with the newest versions of iOS, which is only available on the iPhone 8 and iPad 5th generation, and newer models. Your MacBook or iMac will need macOS Ventura 13.2. If you have older devices and computers, you will not be able to sign into your account anymore. To add security keys, go the Settings app (on your iPhone or iPad) or the System Preferences menu on your Apple computer.

Inside your Apple ID, there are many important things. Keep them safe.